Benefiting from No-AMSDU in Mikrotik
Aug 2, 2016Setting up a Mikrotik as a wireless SOHO router at home is a relatively easy task for even a seasoned system administrator. Setting up 802.11 protocol to perform fast, fluent and adapted to the environment is an advanced thing that requires some in-depth knowledge of the field.
Some time ago I purchased a used RB951Ui-2HnD and set it to work in default mode. After making some basic settings such as the wireless channel, channel width and transmission power, I have noticed that the connection speed and latency in remote corners of the apartment is still awful. The signal is bearable, but I get only 5mbps out of 50mbps download speed over the air. 50 mbps is the tariff that comes from the ISP, but I get some sure 45-48mbps when measured in clear site with the router, over WLAN. My apartment is 70m2 and most of the walls are made of think concrete. Obviously, increasing solely the transmission power will bring nothing, except lots of extra signal noise. I needed a way to improve the situation without purchasing any additional hardware or cabling.
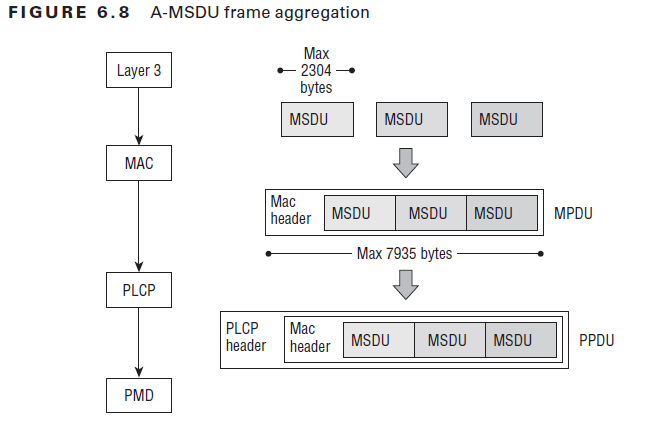
802.11 protocol starting from the e revision boasts a possibility to do frame aggregation on the MAC layer, thus giving more space to solve throughput problems for the technology and improve overall band width by means of the OSI Level 2. The so-called A-MSDU and A-MPDU (Aggregated Mac Protocol Data Unit) units allow consolidating frames, which then contain a few frames at once as long as their destination is the same. This allows avoiding duplicating overhead, which otherwise comes from the MAC layer, the PHY layer as well as inter-frame gaps, etc. At high data rates, this overhead can consume more bandwidth than the payload data frame, so putting it only once when aggregating saves us bandwidth (the ratio of payload data to total data is higher).
Here is how MSDU aggregation works (images from CWAP Study Guide):

There’s a good article explaining this here.
In RouterOS, we have three parameters available in the HT section:
AMSDU Limit, AMSDU Threshold and AMPDU Priorities. There are also options such as Guard Interval, but these should not bother in light of the goal we have. AMSDU Limit is the maximum size of the already aggregated frame, while AMSDU Threshold is the maximum size of a subframe, before aggregation. The maximum size of a AMSDU is 7935 bytes (8192 bytes in Mikrotik notation), so technically we could do a simple calculation to see how many and which size subframes could fit into a aggregated frame. The problem arises right here - the entire package now has only one CRC check and the error rate increases with the number of probable errors. Since the CRC check happens once, we cannot re-send only part of the AMSDU, thus the whole thing is re-sent.
Surprisingly, the secret for Mikrotik setup in my environment was to benefit from setting the default size of A-MSDU, thus dropping A-MSDU as an enhancement in the protocol completely:
AMSDU Limit: 2048
What is set in HT AMSDU Threshold does not make sense no more, so we can leave it as-is.
Here is someting absolutely true from some article I stumbled on:
A-MPDU should not be used with applications that require low latency such as VOIP since the price paid for higher throughput is increased latency.
Although this features A-MPDU, which is more preferred on most devices nowadays, one should understand that A-MPDU requires more efficient hardware, as performance comes from frequent re-sends of the whole aggregated frame, each including and is probably most suitable on long-distance wireless links when applied to 802.11 protocol family.
AMPDU Priorities defines which priority packages are aggregated using A-MPDU mechanism, where lower number means higher priority packages. It’s recommended to use this only for high-priority data, as sending big number of packages using A-MPDU yields high CPU usage and latency of the network device:
HT AMPDU Priorities: 0